My Blogging Reasons:

1) When I was just starting out in the photography world I didn't have a lot of people to help me, I didn't have money to take classes so a lot of it was done the wrong way first. I want this to be a place of resource for beginners/hobbyists and everyday people, a place where you can ask me anything
2) Once I found a network of other photographers there were so many willing to dish out their secrets for free and help me along the way and this is a way I figure I can give back to the community
3) I have learned so much that my head is starting to overflow and I need a place to keep my notes freeing up some of my brain space for other things
4) The best way for me to remember something is to teach it to someone else.

Disclaimer: I don't think nor claim to be the worlds greatest photographer, but I continue to study and work really hard and by golly one day I might just be the best, but for now I will continue to learn right along with you!

I will add onto the lessons, so if something doesn't make sense chances are you are skipping ahead go back and read through the archives. If it is doesn't click ASK me anything anytime!

You can email me any questions or just post it in the comments and I will address them all here.
mailto:amy@amynielson.com

Saturday, September 27, 2008

A Tut For You

For your practicing pleasure. I should preface this by saying I use Paint Shop Pro X2 and NOT Photo Shop BUT you should be able to follow my steps and if you need help finding it in Photo Shop shout!

The original image the only thing done to it was a rotation. I ALWAYS edit the WHOLE image and save it BEFORE I crop or resize it.


My first step is to adjust my levels. What does this do? Play with the sliders/numbers and you will see. I play mostly with the midtones (the middle slider) this helps lighten up the shadows. For this image I used
0 for the black slider
97 for the midtone slider
255 for the white slider


As you can see there is a sort of haze over the image as most digital images will have especially after we lighten the midtones as we just did, so our next step is to bring out the contrast of the image.

Duplicate your layer and set it to soft light. For this image I reduced the layer to 80% this varies from one image to the next. Some I leave at 100% others 50% just depends on the lighting of the image.


Merge your layers and then duplicate it again (I try to do most of my editing in layers because I can have more control of it that way)

I like my colors to pop out and be enhanced a bit and I do this with Hue/Saturation/Lightness. With this step you have to be careful not to do too much your Reds are going to be enhanced the most and you don't want to pop them too much. My settings for this image were as follows and I left my opacity at 100% again this depends on the image sometimes I will drop it down to 20% rarely do I leave it at 100% but this image it works for.
Hue: 2
Sat: 20
Lightness: 0


As far as adjusting the color image I would leave it at this step, but to add a little extra umph to the image we will continue on a bit.

First I straightened the image a bit. In PSP I have a "Straighten Tool" that is very easy to use-it straightens and crops it straight, but I am not sure if PS has one so if you can't find one just rotate the image until the lines are straight and then crop where the image needs it.


We are now going to improve our composition by pulling his face out of the center and up into the frame a little bit. We do this by cropping and we are going to crop to an 8x10. My crop tool has a drop down menu where I can choose what size I want my image to be and then it will keep that ratio.


I didn't like the little wrinkle in his jeans of his left leg and I also wanted to get rid of some of his back so it did not look so big. Notice by doing this simple crop your eyes are more drawn to his face.

Now we burn to also help bring more emphasis to his face. My burn settings are
Hardness: 14
Step: 10
Density: 100
Thickness: 100
Opacity: 28
I burned everything but his skin and lowered the opacity to 85%


I also soften the background a bit more too mostly the wall and the rocks-I use my soften brush which for me is found where the burn brush is.


To pop the color a bit more you can repeat the H/S/L step again and here I reduced it to 45% and tada here is my colored image complete, now on to the black and white.


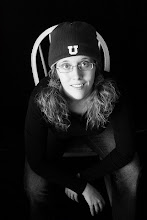
The key to a good black and white is a good colored image so always edit your colored image first and then convert it.

I use Hue/Sat/Lighten for my conversion. Make sure that "colorize" is checked and my settings are
Hue: 14
Sat: 6
Light: 0


Notice how lifeless and flat the black and white is at this level, the skin tones are so gray and boring. Sadly all too often this is where a black and white is left. We are going to take it further though and improve it.


Duplicate your layer and go to levels (I use the same settings as above) lower your opacity down to 40%-because of his fair hair and skin it is not necessary to lighten it up much so with a different subject you might have to raise the opacity more.

Now we have a lighter image that is quite flat still. So we dup the layer and do another soft light layer to it. Since in this case the image was quite flat I left my opacity at 75%


Notice the difference? I like to warm up my images just a tad and do this with curves (I do know that in PS elements you do this in levels) I select the red and green channels and grab a point in the middle and raise it just slightly to your liking.

and there we have it a black and white image and since we did all the little editing with the colored image it is done now. Although I do like to add a little more burning to it-using the same settings as above.


Okay so I forgot to resize the images so I will come back later this week and resize them so when you click on them they are not so HUGE!

Tuesday, September 16, 2008

The Many Ways To Meter

All cameras are a bit different in the way that they symbolize the metering mode, so read through your manual to figure out which symbol is which mode. I shoot with a Canon 40D and most of the Canon symbols will be the same


There is almost always more than one way to meter and to be completely honest once you learn the basics of each metering mode it becomes a personal preference for the situation and look you want. Like most things photography related there is usually more than one right answer. So we will start with the basic symbol and how to use it. Now your camera may or may not have all of these modes but most likely they have a few of them.

[ ] is CENTER-WEIGHTED metering-this means that your meter is taking its reading off of the center of the image and then averaging the rest of the scene. When would you use this? When I want to take a picture of the "whole scene" when I want the blue sky blue and the grass green (unless you are in my yard). When I want detail in all the shadows and all the highlights, just remember that it is not really metering the whole scene just 70%


[ ( 0 ) ] EVALUATIVE metering-this is the most often used (well that is until you learn that you have other options) it is when the camera take into account the entire scene and chooses an exposure that is best for all parts. It is very similar to center-weighted except with center-weighted the meter is only metering 70% of the scene (from the center out) and with evaluative the meter is reading 100% of the scene. When would you use it? The same situations as center-weighted (see there is more than one right answer)


[ ( ) ] is PARTIAL metering-this is when your meter reads only part of the scene (only about 14%) this mode is more popular when you are close in on your subject and you want a specific part of the scene in the best exposure possible. When would you use it? When you want the best possibly exposure of your subject and not the surroundings. This is a very common metering mode for portraits and back lit situations (when the sun is behind your subject)

notice here how much brighter my sky and foreground is, but the tree (my subject) has a lot more detail than the previous examples.


[ 0 ] is SPOT metering-does pretty much what it says it meters a small spot (center of your frame). When would you use this? When there was a very specific part of the image that you wanted exposed properly. For example if I were outside off my porch with my front door open and wanted to take a picture of the inside of my house I would use spot metering and zoom in or place the very center of my frame inside my house take a reading and then I could recompose the shot (making sure to use the same settings as my reading). Doing this will more than likely make my front porch overexposed, but the inside of my house properly exposed. In this same situation if I had used evaluative metering my meter would have averaged the scene causing the inside to be very underexposed and because it is so underexposed it is going to pull down the exposure of the outside also making it underexposed a little too. This feature is newer and is not on older SLR models but you could get the same results by using partial metering (just remember that your spot is bigger)


We are not going to get into exposure compensation with this assignment and in all of the examples I metered at "0". This is to help you get an understanding of when and what metering mode to use. I 90% of the time shot my portraits in PARTIAL metering mode because I can get the most accurate reading on my subjects (since that is what I am taking a picture of) and 90% of my landscapes are taken in EVALUATIVE mode (since I want the whole scene in the best possible exposure) exceptions are when I want to capture sun flare with back light and then I use PARTIAL and treat the trees or other objects as my subjects, if I used EVALUATIVE in this instance I would get my foreground too dark and have to do too much editing afterwards.

Okay your assignment this week is to take a picture using all 4 metering situations choosing which option is best for your image. Because most SLR cameras only have 3 metering modes you will have to improvise with the partial metering mode for your spot metering picture . I want your images to differ (unlike mine) no fair using the same "subject" but you don't necessarily have to use a live subject.

Tuesday, September 9, 2008

Shoot Out...

...I thought I would post all my images from our shoots here with my settings (above each shot) and such-if you have any questions fell free to ask. Oh and I love to hear feedback on my images learning to critique an image helps you to see more in your images.

Cute CUTE girls!

ISO 200; SS 1/400; F4.0


ISO 200; 1/250; F4.0 ISO 200; 1/320; F4.0
ISO 800; 1/200; F6.3
ISO 800; 1/250; F6.3

ISO 200; 1/200; F6.3 ISO 200; 1/640; F2.8
ISO 200; 1/200; F2.8
ISO 800; 1/160; F6.3
ISO 800; 1/200; F6.3
Notice what a difference it makes to walk around and rotate the camera-this shot doesn't show enough of what she is looking at and the lines of the door pull the eye out from her and to the edge of the image
This one there still is lacking of space for her to look into, but at least now the lines of the door (and of the shed to the left) draw the eye back to her
This one we have lines drawing the eye to her in both directions as well as space for her to look into
ISO 800; 1/2000 (yup that is right-totally forgot to bring my ISO back down after the sun came back out from the clouds-ahwell-good thing for my wonderful camera that can handle a high ISO!) F2.8

Okay lets see what you got! Send me 3 images (your favorites) both edited and not edited. Send the non edited file as big as you can so I can really see and you can resize the edited one to 700 pixels on the longest side. If you attach them as a photo rather than a file you can send bigger attachments. Also send me what you have from last week and I will work on getting an assignment up tomorrow night...

Tuesday, September 2, 2008

The Composition Says It All

Okay so maybe not all, but most. It is what separates a snap shot from a portrait, it is what makes an images an "ahhh" moment or an "ehhh" moment.

So the basic rules:

1) keep it simple-watch your backgrounds for unwanted clutter, use props that bring the focus to the subject and not ones that become the subject. Remember you are taking a picture of your subject and not your surroundings

2) rule of thirds-keeping the most important parts of the image along the intersecting lines of the thirds-see example-avoid placing objects of interest in the center.

3) eye travel-when you look at an image pay attention to how your eye travels, the more you do this the easier it is to see. When you are composing your shots watch for leading lines-do they lead into the frame or out of it? Where is your negative space is it in front of the eye or behind the head?

4) Point of view and angles-pay attention to the angle you are shooting your subject and ask yourself is this a snap shot position or a portrait position? Is the angle you are shooting at flattering to your subject?

Okay so your homework assignment(s)-I hope you are reading this because I am changing it just a bit.

1) ABC word creating interesting angles and compositions also paying attention to your exposure and focus, take pictures of objects that create letters see here for examples. Create a word and submit it for critique on compositions, focus, and exposure.

2) take one object and shoot it from at least 5 angles/directions/depth of view send me all of them and the one that you like the best and why.

3) send me at least 3 other images for composition critique